
Hail Repair Pricing
PDR Pricing Explained for Missouri Hail Repairs

FSDAVCFEBFEVSDDVFSD
FSDAVCFEBFEVSDDVFSD

FSDAVCFEBFEVSDDVFSD
How the hail matrix guides your quote
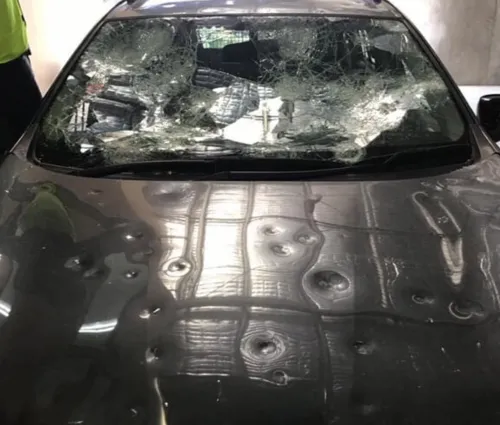
Paintless Dent Repair isn’t guesswork at Dentex Midwest. We price hail damage using a standardized hail matrix that measures dent size, count, and difficulty. That means your estimate follows clear criteria rather than haggling. It keeps repairs consistent, protects factory paint, and helps insurers approve claims more quickly.
Hail matrix pricing starts with size tiers, then adjusts for dent density per panel, depth or creases, bodyline challenges, panel material, and tool access. We also account for R&I time, corrosion protection, and ADAS calibrations. The result is a transparent, Missouri-ready quote built for insurers and drivers alike.
Understanding dent size density cost factors
PDR size tiers typically move from dime to nickel, quarter, half-dollar, and larger. Each dent’s diameter sets the base price because bigger metal displacement requires more controlled pushes and precision tapping. On hail jobs, we tally sizes across each panel, so a roof packed with quarter-sized dents prices differently than scattered nickels. Density magnifies the starting count.
Density reflects how many dents appear on a single panel. Technicians use ranges, like 1–5, 6–15, 16–30, or higher, to apply multipliers because clustered damage demands slower, finer tool work. A hood with thirty dime dents takes longer than five quarter dents; the matrix captures that workload difference fairly. It rewards accuracy, not guesswork or haggling either.
Depth and creases matter, too. Deep strikes stretch metal and require extra finesse to clean the lows without creating highs. Creases run along a line, so technicians must chase distortion further, adding time. Both conditions add multipliers in the hail matrix because they increase precision, tool variety, and patience required for perfection on difficult panels and edges.
Bodylines, access, and panel construction
Bodylines are intentional ridges that give panels strength. Moving metal there is harder because pushes can travel or crown, so the matrix applies a bodyline difficulty factor. Access matters as well: double-skin areas, bracing, crash beams, or sound deadener may limit tool paths. When access is limited, we use glue pulling, which can add time—especially on roof rails and quarter panels too.
Panel material also influences pricing. Aluminum resists movement more than mild steel, so an aluminum panel surcharge is common on the hail matrix. High-strength steel may similarly require slower, smaller pushes. Roof rails, hatch lips, and door edges combine stiffness and limited access, so we plan extra time and specialized tips to finish them cleanly without micro highs or wavy reflections left behind.
Here’s a simple example. Your hood has fifteen nickel dents and five quarter dents, all shallow, with easy access. The matrix sets a base for the nickel group, another for the quarter group, then applies a modest density factor. Because depth is mild and no bodylines are involved, the total stays close to base. Add R&I for under-hood insulation, and you have a fair, documented estimate that insurers understand and approve quickly too.
Now consider a roof with thirty dime dents crossing roof rails, plus several creases. The base starts small for dime size, but density, bodyline, and crease multipliers raise workload. Access through headliner requires R&I time, and glue pulling may be needed near braces. Add aluminum panel surcharge if applicable, corrosion protection, and post-repair ADAS calibration if cameras sit near the mirror mount. Those additions reflect real time and precision, not upselling at Dentex.
Why estimates vary between vehicles
Two cars with similar dent counts can price differently because panel shapes, bracing, and materials aren’t identical. A coupe’s long doors may flex differently than an SUV’s shorter, reinforced doors. Sunroof cassettes and roof airbags change access on top panels. Tool placement and leverage decide how fast clean pushes happen, which the hail matrix reflects in practice.
Model-specific procedures can add line items. Some vehicles require scan-tool health checks and ADAS calibration after roof, door, or liftgate repairs. Others call for corrosion inhibitors where trim clips pass through repaired panels. These aren’t surprises; they protect electronics and longevity. Your printout lists them separately so you can compare estimates apples-to-apples with confidence and clear pricing.
Finally, finish goals affect time. Removing every micro ripple on a collector car demands more inspection lighting and patient blending than a daily driver where tiny cosmetic waves are acceptable. We’ll explain options, but our standard at Dentex Midwest is factory-level quality wherever PDR is appropriate, aligned with Missouri insurance guidelines for safe, consistent claim handling statewide.
What R&I and protection include
R&I means remove and install. We remove trim, lamps, liners, or handles to create access for clean tool work, then reinstall them to OEM standards. This avoids drilling and preserves the vehicle’s integrity around airbags, wiring looms, and cameras.
Corrosion protection covers sealers or cavity waxes where clips pass through panels repaired with PDR. On aluminum, we apply isolators to prevent reactions.
ADAS calibration applies when cameras or radar are disconnected or mounting surfaces are disturbed. Many windshields and mirror mounts integrate cameras. After hail repair, a static or dynamic calibration ensures driver-assist systems function as designed and specifications remain valid.

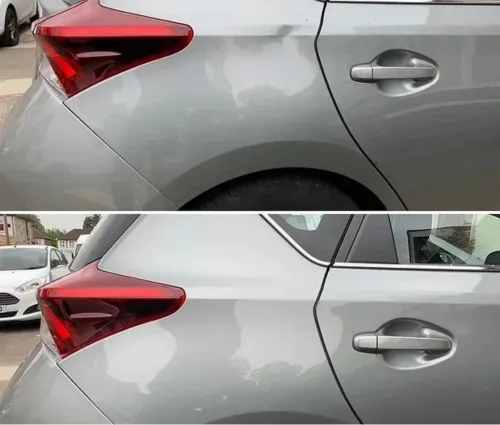
Because PDR preserves factory paint and panels, it usually saves time and value compared with conventional bodywork. The hail matrix helps us document that value clearly for insurers, too. You’ll see how size, density, material, access, and R&I add up, rather than a single lump sum. That transparency lets you weigh repair speed, cost, and results—and decide what’s best for your car and your insurance claim. It also simplifies approvals and accelerates scheduling during hail season.
Comparing estimates the right way
When two shops quote different numbers, compare the same categories. First, check size and density counts for each panel line; they should be similar if inspectors saw the same vehicle in the same light. Next, look for crease and bodyline multipliers where applicable. Missing those can create an artificially low price that later grows once technicians start pushing. Also confirm depth notes and whether aluminum surcharges were applied when appropriate.
Then review access notes and R&I. If one estimate includes headliner or trim removal and the other does not, ask why. Some models simply require it to reach braces or roof rails. Glue-pull plans should be disclosed on limited-access areas. Corrosion protection should be listed where clips pass through panels. These are professional, expected steps—not add-ons—and they keep results clean and durable. They also streamline insurer reviews and approvals sign-off.
Finally, verify scans and calibrations. If a shop will disconnect cameras, radar, or mirrors with embedded sensors, calibrations may be required by the automaker. Ask whether they perform these services in-house or with a certified partner, and whether reports are included. An estimate that omits necessary calibrations may look cheaper today, yet create warning lights or liability tomorrow. The right quote protects safety systems and your time and warranty coverage.
Dentex Midwest
Professional Hail Repair & PDR
Stay Up-to-date With Our Content
Subscribe to learn more about our mission!
Stay Up-to-date With Our Content
Subscribe to learn more!
Contact Info
Service Hours
Social Media
Home
Services
Service Areas
Blog
About
Contact
Contact Info
Service Hours
Mon - Fri: 8:00 am – 6:00 pm
Saturday: by Appointment
Sunday: Closed
Social Media
Licensed, bonded, & insured